SIMs Software Integrations
You can use Joinos - Pebble’s platform for helping you and the parents of your pupils communicate, pay for trips, school activities and meals or you can use ParentPay or sQuid - third party online e-payment SIMs which do the same. Each of these has a separate menu as outlined below.
You can also integrate with ParentMail, SchoolComms and SchoolMoney but these integrations do not have a separate menu in Fund Manager. If you are integrating with these platforms, you need to export a CSV file of the information from the platform and then import it into Fund Manager, using the Transactions > Import Transactions option.
Note: It is your responsibility to handle personal data in accordance with GDPR law.
Tip: Remember you can get more help on anything you read in this chapter by checking the help on the Fund Manager screens. For more information, see How to access Fund Manager.
Joinos
If you use Joinos there are also Joinos options available on the Administration menu (see Administration).
There are two ways of creating offers at present; one is available to all while one is being beta tested currently.
Create Offer v2
- Select the Account the Offer is associated with.
- Select a VAT Code (the default is zero).
- Choose a Ledger, if applicable.
- Choose the Fund Manager Settlement Account which transactions will be recorded against.
- Enter a Title and Description for the offer. You can also choose an icon to be displayed to users within their Joinos portal.
- Select Gift Aid if you would like to claim Gift Aid on the offer.
- Select Consent Required if you would like your parent/carers to give online consent.
- Select Required if you require the parent or carer to make the payment.
- Select the Start Date and End Date for the offer. Select No end date if the Offer has no end date. Select whether the Offer can only be purchased once or the Offer can be purchased multiple times or in instalments.
- Enter the Offer Costs, including the Total number of items you have and the Cost of the item.
- Attach any files you would like to make available for parents to view on the offer screen. You can attach new files or files you have uploaded previously.
- Select the names of pupils who are eligible for the Offer. You can use the Add Group button to add names to an offer in bulk by the Group they’re attached to.
- When you are ready to post your offer to parents/carers, select Post this offer and click Save.
Create Offer
- Select the Account the offer is to be receipted against in Fund Manager.
- Choose a VAT code if applicable.
- Select your Settlement Account.
- Enter the Offer Details.
- Give your Offer a short Title.
- Give your Offer a Description, i.e. Total cost of visit is £300. This can be paid altogether or by instalments of £50 – let your parents/carers know exactly what you want them to do, how you want them to pay and when.
- Specify whether consent is required. Select the check box if you want to ensure that parents or carers cannot pay unless they agree to giving online consent.
- Enter the Amount if the Offer is a set amount.
- If the Offer is open to multiple payments or the parent/carer can decide how much to pay for each instalment, select the Unspecified check box.
- Open Administration > Manage Accounts.
- Select the account for the offer you want to share.
- Ensure the account is marked In Use.
- Select the Share Balances check box.
- If you want to ensure parents and carers cannot pay below a certain amount, enter the amount in the Minimum box.
- Enter the Offer Dates.
- Choose the Start Date from when you want parents/carers to see the Offer.
- Choose the End Date - this is the date the Offer will no longer be available to parents/carers.
- Select Recurring if you want parents/carers to be able to pay more than once for the same offer.
- Enter the Offer Quantities.
- Min = 1 Max = 1 Means usually one pupil one time/trip/visit/occasion.
- Min = 1 Max = 2 + Means usually one or more item/ticket/place/tie can be purchased in one transaction.
- Items Available means usually how many seats/tickets/coach spaces are available. Once the number of available items is sold no one else can buy, the Offer is ‘Sold Out’.
- Unlimited means you will never exhaust supply.
- Select any Attachments that you want to include with the Offer.
- Select the names of pupils who are eligible for the Offer.
- Either Post Offer or Save without Posting (which saves a draft for you to complete later). When you post the offer, it becomes visible to parents/carers on the Offer Start Date. An email is also sent to parents/carers notifying them of the Offer being posted.
If you want parents/carers to see what they have paid:
Note: If you want to close an offer early, or cancel it, change the End Date to the current or previous day.
Note: Documents are only listed here if they have been uploaded first using Upload Documents.
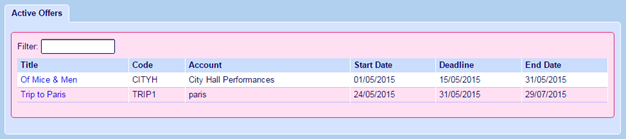
Active Offers
You can access active, pending and expired offers from the Active Offers menu option. Selecting Active Offers displays a screen with three tabs - Active Offers, Pending Offers and Expired Offers.
- Locate the offer in the list of offers and click Amend.
- Amend the details required.
To close an offer or cancel it:
- Locate the offer in the list of offers and click Amend.
- Change the End Date to the current or previous day.
- Locate the offer in the list of offers and click Extend.
- Enter the date you want to extend the offer to.
Pending Offers
You can access active, pending and expired offers from the Pending Offers menu option. Selecting Pending Offers displays a screen with three tabs - Active Offers, Pending Offers and Expired Offers.
Use the Pending Offers tab to view what offers are currently pending. Offers will show up in this list as long as they have been saved but not posted or if their Start Date is in the future.
You can amend pending offers, posting them or removing them as required.
Expired Offers
You can access active, pending and expired offers from the Active Offers or Pending Offers menu options. Selecting either menu option displays a screen with three tabs - Active Offers, Pending Offers and Expired Offers.
Use the Expired Offers tab to view offers that have expired. Offers will show up in this tab if they have been posted and the End Date has passed.
Documents
Upload Document
Use this option to upload documents that you want to attach to offers, for example, trip itineraries or cost breakdowns or newsletters.
Warning! Do not upload any private or sensitive information.
Documents
Use this option to view documents that you have uploaded to attach to offers.
If a document is attached to an offer you can view the offer by clicking Attached Offers.
To detach a document from an offer, click Attached Offers and then click Remove.
How to transfer Joinos payments so you can
Within Fund Manager, you are required to have a Joinos Settlement Account that all of the money is imported into and this should have been set up for you before or during Training.
Transfer the amount
Once you have received your Bank Statement you will be able to transfer the total transaction net amount credited on your Bank Statement from the Joinos Settlement Account to your chosen Bank Account so you can reconcile the bank account in Fund Manager;
- Open Bank & Cash > Transfer between Bank Accounts.
- Select the Transfer From Settlement Account.
Record Joinos Charges
After the transfer(s) are complete, you must now record any ‘bank charges’ back into the Current Account. To do this, you must have a user account set up called e.g. Bank Charges. You should also have an organisation name to transact against e.g. Joinos Bank Charges. For more information on setting up bank accounts and organisation names, see Administration
-
Record a Payment (Direct Debit) against the Current Bank account of the amount of the Charges. You will already have transferred the GROSS amount from the Settlement Bank account which includes the e-payments and also includes your charge(s).
-
You will now be ready to record the transaction, to do this, go to Transactions > Record a Payment.
-
In this screen you will now select your user account (Bank Charges) and of course, your new name. Fill out the relevant information and the amount of your charge then select your Type as Direct Debit.
You must ensure your bank account (in the centre of your payments screen) is your Current Account.
-
Select Save.
You now have your original gross transfer and the direct debit refund/charge against your current account ready to reconcile.
Note: You MUST record these back in against your Current Account as a Direct Debit and NOT against the Settlement Account.

Messaging
New Message
Use this screen to compose and send email messages and SMS text messages to pupils’ parents and carers. You can only send messages to people who have provided an email address or a contact phone number, preferably a mobile number. These can all be added to a student’s name, using Administration > Manage Names.
Note: Using MISapp will automatically import your pupil’s names into Fund Manager if you have SIMS MIS.
- Open Messaging > New Message.
- Enter the Title and Body of the message.
- Select any attachments that you want to include with the message.
- Select the names in the Contacts list to send the message to.
- To send the message as an SMS Notification, select Send selected contacts a message alert via SMS.
- Click Send.
Note: Before you can select attachments to include with the message, you must upload these using Joinos > Upload Document.
Note: This will only work where the student has a phone number listed. Most, but not all, home telephones are able to receive test messages, but where possible a mobile number is preferable. You can specify which phone number is primary if there are two or more numbers listed for a student. For more information, use the Manage Phone Numbers tab under Administration > Manage Names.
Confirmation is shown at the top of the screen.

The message will appear within a short time in the parent/carers Joinos. If they are already logged on they may need to refresh their screen to see the latest messages.
History
Use this screen to review the messages that have been sent.
Clicking the title of the message displays the message detail. This is the Title and Body of the message along with the contacts who the message was sent to. You can also see whether the message has been read or not here.
ParentPay
ParentPay transactions can be imported into Fund Manager manually in the same way as ParentMail, SchoolComms and SchoolMoney transactions, manually importing via CSV files, but we recommend that you import them automatically. The automatic integration is described here.
Map Names
Names should map automatically in Fund Manager from your MIS or MISapp using the Pupil's unique MIS number in the same way as ParentPay uses the Pupil MIS number to collect payments. Sometimes Names are not automatically Mapped, often Staff Names or Pupils that are not part of the usual Pupil cohort and not held within your MIS system with a permanent upn.
If this is the case use ParentPay > Map Names to match the Name on the right to the drop down Name on the left and, this will automatically tick the box to the left of the left hand side Name for you. If there is no Name to match it to on the right then ignore that Name for the time being and move onto the next one, repeat the process through all of the pages then click Import Names. If you click Import 100, Fund Manager will automatically import the first 100 names on the list.
Note: If you import names and then have duplicate names, you will need to merge the names. For more information on this, see Consolidating Pupil Names in Administration.
Accounts
Map Accounts/Payment Items
You will need to Map your Accounts in Fund Manager with your Payment Items (Accounts) in ParentPay in order for the Transactions to Import into the correct Names and Accounts in Fund Manager
- Open ParentPay > Map Accounts/Payment Items.
- Match the ParentPay account on the left with the Fund Manager account on the right.
- If you don’t want to import transactions into some accounts because the money is going to a different bank account for example, click Hide alongside the account.
- If you can’t find the account in Fund Manager, you will need to create a new account, using Administration > Manage Accounts > Create New Account. You can do this later and return to map those later. Finish the mappings as far as you can for now.
- Click Map Payment Items.
Note: You will need to map each new account in Fund Manager every time you create a new one in ParentPay if these Transactions need Importing into Fund Manager, however you will only see the new Payment Item in Fund Manager after the first transaction is processed, you will then be able to map this Payment Item to an Account in Fund Manager.
Tip: If you prefer you can map the Payment Item in your ParentPay software. When you set up a new Payment Item you will need to populate the ‘Group 1’ Code and Description at the bottom of the setup form with the same Account Code and Description you would like the transactions to flow into in Fund Manager, before you save the Payment Item. This mapping will be mirrored in Fund Manager so please be sure you use the correct Account Code and associated Bank Account when you enter these fields in ParentPay
Map Settlement Accounts
Note: This is usually completed at Training, but if you add a further Bank Account to ParentPay and you wish to see these Transactions in Fund Manager then Pebble can map this Bank Account for you.
Fund Manager needs to place your Imported Transactions into a Virtual Holding Bank Account called a ParentPay Settlement Account until you are ready to Reconcile your Bank Statement/s. This is because Parents/Carers pay for Payment Items in Full and this needs to be reflected in both ParentPay and in Fund Manager as a complete Payment for an Item against a Pupil Name. However ParentPay Settles to your designated Bank Account/s once a week as a NET Transaction NOT GROSS. The difference between the net amount paid to your designated Bank Account and gross figure is the Transaction Invoice/s that ParentPay supplies you with online via: ParentPay site>Finance>Reports>Collection Service Invoices
Note: You can also check via ParentPay site>Finance>Reports>Collection Service Statements that your Settlements to your designated Bank/s balances with the Transactions taken Online and through PayPoint (if used)
Reports
Unmapped ParentPay Transactions
Any transactions that have not been or do not need to be mapped will be seen in the Unmapped Transactions tab. Once the initial Integration has taken place the most recent transactions will appear at the top of this list. If you identify a Payment Item that you cannot see in Fund Manager it might be because you have not mapped a name and/or account to this transaction type. If this is the case you will need to do this by using the option Map Accounts / Payment Items or contacting Pebble to ask for another settlement account to be mapped.
Other
This screen is used to enter ParentPay credentials and specify the date from which you want to import transactions from ParentPay into Fund Manager (if this is different from the default period beginning date) but this is done for you before you complete training.
How to
Once your ParentPay Transactions have started Importing into Fund Manager you will see the ParentPay Settlement Bank Account credited with ‘Virtual’ money.
Transfer the amount
Once you have received your Bank Statement you will be able to transfer the total transaction net amount credited on your Bank Statement from the ParentPay Settlement Account to your chosen Bank Account so you can reconcile the bank account in Fund Manager;
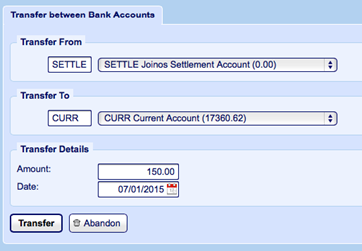
- Open Bank & Cash > Transfer between Bank Accounts.
- Select the Transfer From Settlement Account.
- Select the Transfer To Bank Account.
- Enter Amount
- Enter Date
- Click Transfer
Record payment
You can then ‘Record a Payment’ in Fund Manager for the debited fees, the difference between the net amount paid to you and the gross amount paid by the parents on your Bank Account Statement to balance your ParentPay Settlement Account.
Note: You can find these transaction service invoices in ParentPay in the reporting section.
- Open Transactions > Record a Payment
- Select the Settlement Bank Account.
- Enter the transaction details and select Direct Debit for the Type against the Settlement Bank Account
- Click Save and then split the payment to the different accounts if you want.
Setting up, posting and amending offers is all done in sQuid now and so provided everything is set up and working in sQuid and you map the sQuid offers to Fund Manager accounts, importing sQuid transactions is an automatic process.
View Offers
Use this to amend offers you have already posted.
You will now be able to see the offers that are live on this screen, please note you must select the offer title to view.
You will now be able to make any necessary adjustments to your offer, this can include adding/removing names or changing dates etc. Please ensure you select Post Offer before leaving to allow the updated information to reach the parents.
To remove an offer from sQuid, you must first repeat the steps of going into amend your offer. Once inside the offer, you can simply change your current end date to BEFORE the start date. This process will immediately remove the offer from Fund Manager AND sQuid.
Note: You will not be able to view expired/removed offers
Post New Offer
Listed below are the fields that you are required to fill in when creating an offer. To post an offer, you must go to sQuid>Post New Offer
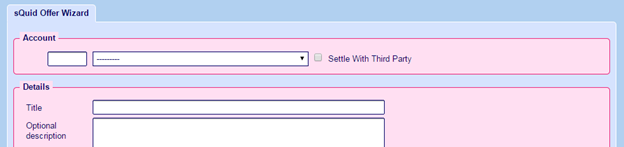
- Account - The user account into which the money will be recorded
- Title - What the parents see on their sQuid portal when looking at the offers
- Amount - The amount you want the parent to pay. This can be set to ‘Unspecified’ which will allow the parent to pay any amount they like towards the offer
- Start Date - when the offer will appear, End Date - when the offer will be removed/deleted, Deadline - when the School would like the money to be paid -
- Min -the minimum amount of ‘slots, items or places’ available, Maximum - how many the parent can buy, Items Available - how many slots e.g. seats available on a coach trip etc
- Recurring - can be used on offers for school uniform eg ties etc. Something that the user would like to have available for a set period of time
- Mandatory Checkbox Text & Optional Checkbox - Displays a checkbox for the parent to tick, similar to a Terms and Conditions checkbox when downloading a program to your pc. Not necessary to complete these
- Names - At least one name MUST be selected to post an offer correctly
Note: The offer will not display to the parents if a future date has been set as the Start Date
Note: Please ensure Maximum items does not exceed 100,000
Use this to map the sQuid offers to Fund Manager accounts so that imported transactions are added to the correct user accounts and names in Fund Manager. The money will be added to the sQuid Settlement Account.
sQuid offers are listed in the Name column.
- Select a Fund ManagerAccount for each sQuid offer.
- Click Map Payment Items.
In most cases, names will map automatically in Fund Manager from your MIS or MISapp. Sometimes Names are not automatically Mapped and this can mean some transactions aren’t imported. Use sQuid > Map Contacts to ensure that all the contacts have mapped and to map any that haven’t mapped automatically.
- Open sQuid > Map Contacts.
- Select the Fund Manager name to match from the Choose Name drop-down.
- If there is no matching Name to select in the Choose Name drop-down, you will need to import the names.To import names:
- Select the check box to the left of the Imported Name,
- Click Import Names.
The list of contacts in sQuid is displayed. The Imported Name is the name of the contact in sQuid.
Note: If you import names and then have duplicate names, you will need to merge the names. For more information on this, see Consolidating Pupil Names in Administration.
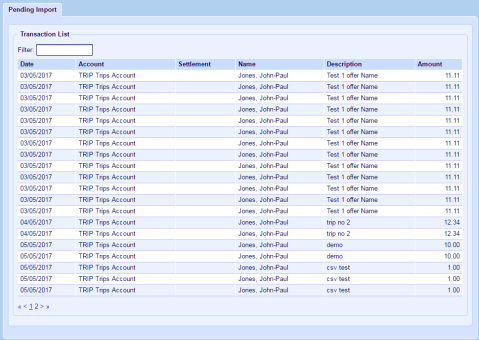
Import of sQuid transactions into Fund Manager is automatic, provided you have mapped sQuid offers to accounts in Fund Manager.
Until you have mapped sQuid offers to Fund Manager accounts, the list of transactions to import will be greyed out as in this example:
When you have mapped sQuid offers to Fund Manager accounts, the list is no longer greyed out:
Where’s the money
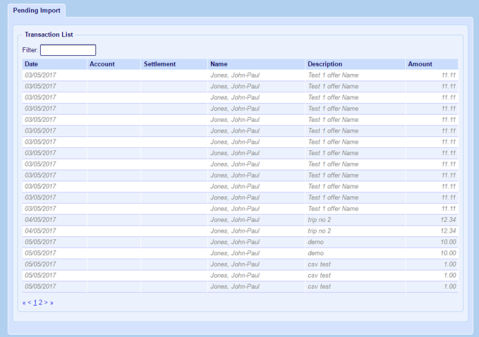
After the offers have been posted and parents start to pay, you will use the screen below to import the transactions for the students/user account.
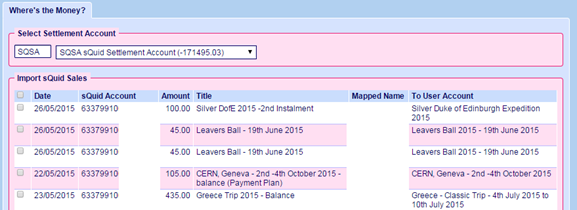
You must:
- Select the Settlement Account for the money to be imported into
- Tick any transactions to be imported
- Select ‘Import’
Once imported, your transactions will show in Fund Manager against the correct user accounts and names. The money will be added to the sQuid Settlement Account.
Configuration
Each pupil has an SRN (sQuid Registration Number) and a CVV (Card Verification Value). This information is provided by sQuid and is needed before registering.
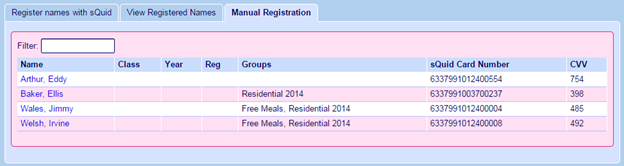
The students details can be viewed by going to sQuid > Register Pupils > Manual Registration.
The other tabs available within sQuid > Register Pupils are:
- Register Names With sQuid - You can register students here who are not already setup on sQuid - If you are an IMPACT school and receive your card numbers from a catering company, please ensure you speak to us about your file before attempting to Register these pupils. To Register a pupil, Find the name to register, click the small square to the left of the name (you can select multiple names) then click the Register Names button. This is automatically sent to Squid to process and when they have completed this, the name(s) will appear in the View Registered Names tab.
- View Registered Names - You can use the tab to see who is registered with sQuid. It will also show ALL cards registered to that child (old/lost/expired etc.) Fund Manager, however, will know which card is linked to sQuid and use the correct number. These are NOT duplications in the system. Remember to ensure that the card has the correct purses added. When the new intake of pupils is registered you can then print out all their registration letters at one go. Select the year group and click Search > Print Registration Letters.
- Manual Registration - If you require to add/amend a pupils sQuid information manually, you can use this screen to do that. Simply Search for and select the pupils name (in blue) and it will allow you to edit the card details.
Configure sQuid
Use this screen to set up the integration between the sQuid e-payment system and the school in Fund Manager. All of the information required is provided by sQuid to Pebble.
How to transfer
Within Fund Manager, you are required to have a sQuid Settlement Account that all of the money is imported into (via the sQuid > Import sQuid Sales).
Transfer the amount
Once you have imported your transactions, you will be able to transfer the total Transaction amount from the Settlement Account to your chosen Bank Account by doing the following:
- Open Bank & Cash > Transfer Between Bank Accounts.
- Transfer from Settlement Account.
- Transfer to desired bank account to reconcile.
- Enter Amount.
- Enter Date.
Record charges
After the transfer(s) are complete, you must now record any ‘bank charges’ back into the Settlement Account. To do this, you must have a user account set up labeled sQuid Bank Charges. For more information, see Manage Accounts in Administration.
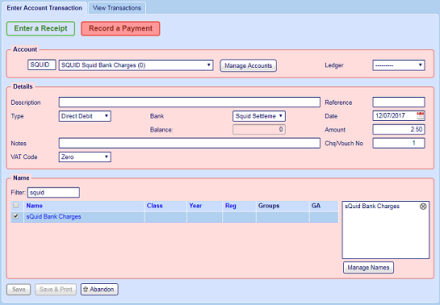
You must record a Payment (Direct Debit) back against the sQuid Settlement Bank account for the amount needed. This will reduce the Settlement Bank account to now include your charges.
When to contact us
| Pebble | sQuid |
|---|---|
| Any issues with regard to | Any issues with regard to |
|
|
|
|